

What if keeping your home warm in the depths of winter doesn't require scorching-hot radiators or brute boiler power? For years, British households have relied on sudden blasts of high-temperature heat, leaving many to wonder whether an air to water heat pump installation can genuinely handle a freezing January evening without tearing up every floorboard in the house.
It's completely natural to worry about domestic disruption, noisy outdoor units, or whether you'll need to rip out your existing pipework. The truth is far simpler: dependable low-carbon warmth comes down to precision hydraulic design and room-by-room calculations, not disruptive overhaul. When a system is tailored specifically to your property's heat loss, it runs quietly, protects your everyday comfort, and keeps your living spaces steadily warm all winter long.
This guide explains how an air to water heat pump installation works from the initial property survey right through to final commissioning. You'll discover what happens to your radiators, where the outdoor unit sits under current planning rules, and how a properly sized setup delivers reliable warmth year-round.
Key Takeaways
- Understand how an air to water heat pump installation transfers ambient outdoor energy straight into your existing wet radiators and hot water cylinder.
- Discover why a room-by-room heat loss calculation protects your system from short-cycling, excessive electricity draw, and premature wear.
- Learn what to expect during the physical fitting process, including realistic project timelines, boundary clearances, and pipework connections.
- See how precision hydraulic balancing and proper commissioning ensure balanced comfort in every room across your home.
- Find out how partnering with accredited heating engineers guarantees consumer protection, compliant design, and dependable seasonal performance.
Understanding Air to Water Heat Pump Systems and How They Heat Your Home
An air to water heat pump sits outside your property, quietly drawing warmth from the surrounding atmosphere. It gathers this ambient thermal energy and upgrades it, transferring that heat straight into your domestic wet central heating circuit. Unlike air-to-air units that blow warm air into a room like an air conditioner in reverse, an air to water system pumps heated water directly through your existing radiators, underfloor pipework, and domestic hot water cylinder.
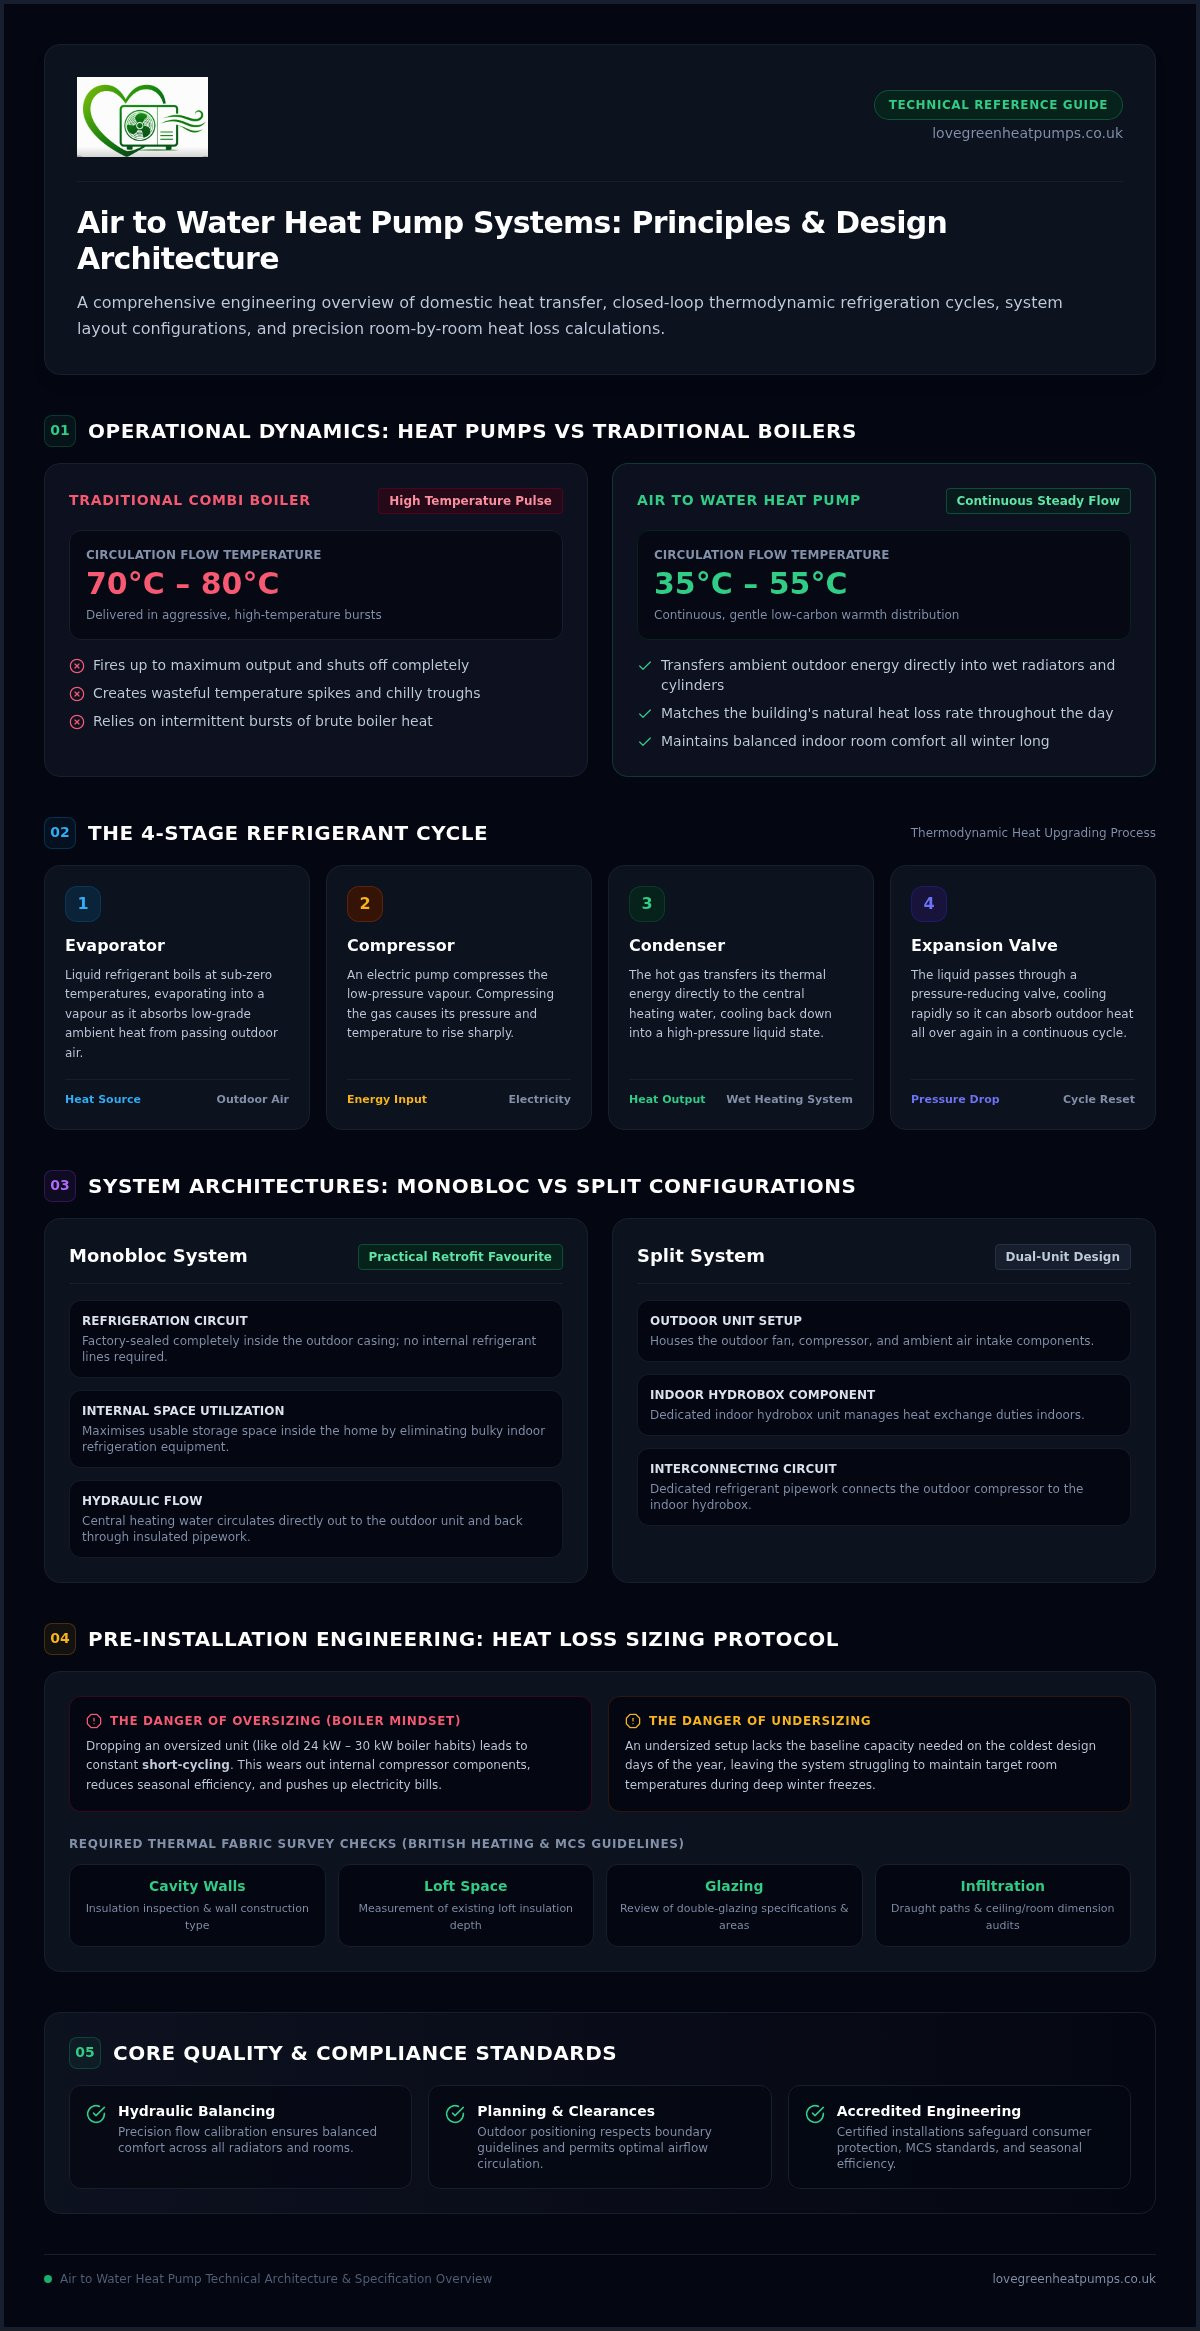
Traditional combi boilers work through aggressive bursts of high heat, firing up to 70°C or 80°C before shutting off completely. Heat pumps take the opposite approach. They provide a steady, continuous trickle of gentle warmth, circulating water at lower temperatures between 35°C and 55°C. This steady operation matches your home's natural heat loss rate throughout the day, maintaining comfortable room temperatures without the wasteful temperature spikes and chilly troughs typical of old heating systems.
The Refrigerant Cycle: Transforming Outdoor Air into Domestic Heat
Understanding how air source heat pumps work comes down to a simple, four-stage thermodynamic cycle:
- Evaporator: Liquid refrigerant boils at sub-zero temperatures, evaporating into a vapour as it absorbs low-grade ambient heat from passing outdoor air.
- Compressor: An electric pump compresses this vapour. Compressing the gas causes its pressure and temperature to rise sharply.
- Condenser: The hot gas transfers its thermal energy to your home's central heating water, cooling back down into a liquid state.
- Expansion Valve: The liquid passes through a pressure-reducing valve, cooling rapidly so it can absorb outdoor heat all over again.
Modern refrigerants remain remarkably effective even during sub-zero British weather, reliably converting low-grade outdoor air into comfortable space heating and hot domestic water.
Monobloc vs Split Heat Pump Architectures
When planning an air to water heat pump installation, you will encounter two main equipment configurations: monobloc and split units.
Monobloc systems house all refrigeration components inside the outdoor casing. Water from your central heating circulates directly out to the unit and back indoors through insulated pipes, meaning there are no internal refrigerant lines. Split systems divide these duties: an outdoor unit houses the fan and compressor, while an indoor hydrobox handles the heat exchange via dedicated refrigerant lines.
For most residential retrofits, monobloc units remain the practical favourite. Because the refrigeration circuit is factory-sealed, an air to water heat pump installation using a monobloc design simplifies the physical fitting process, eliminates indoor refrigerant pipework, and maximises usable storage space inside your home.
Pre-Installation Preparation: The Crucial Heat Loss Survey and System Sizing
Every dependable air to water heat pump installation begins with rigorous maths rather than quick guesswork. Traditional heating engineers often installed boilers using rough rule-of-thumb estimates, frequently dropping an oversized 24 kW or 30 kW boiler into an average home. Heat pumps cannot be treated this way. An oversized heat pump constantly turns on and off; this short-cycling wears out internal components, reduces seasonal efficiency, and pushes up electricity bills. An undersized unit, meanwhile, struggles to maintain comfortable room temperatures during deep winter freezes.
British heating standards and Microgeneration Certification Scheme guidelines require a room-by-room heat loss survey before fitting any equipment. A heating surveyor inspects the home's thermal fabric: measuring cavity wall insulation, checking loft insulation depth, reviewing double-glazing specifications, and identifying draught paths. This detailed technical check ensures the system matches your property's precise thermal envelope on the coldest design day of the year.
Room-by-Room Heat Loss Calculations Explained
During the technical survey, the surveyor records ceiling heights, floor areas, external wall construction types, and window dimensions for every room. They calculate peak heat loss in watts for each space individually. Calculating these losses room by room guarantees the compressor delivers the required baseline output without resorting to expensive direct-electric immersion heaters during chilly weather.
Evaluating Radiators and Internal Heating Pipework
Heat pumps run most efficiently at flow temperatures between 45°C and 50°C. Because these temperatures sit below standard combi boiler levels, the surveyor inspects the surface area of every existing radiator. Some rooms might keep their current units, while others might need single-panel radiators upgraded to double-convector or high-output aluminium designs. The heating engineer also inspects distribution pipework diameters, confirming the pipes can deliver adequate water flow without excessive resistance. Homeowners curious about planning each stage can consult the Energy Saving Trust's step-by-step installation guide for broad overview advice.
Electrical Supply Checks and DNO Notifications
A successful installation also requires electrical verification. The engineer inspects your domestic consumer unit, checks the rating of your main service fuse (typically 60A, 80A, or 100A), and confirms earthing arrangements. Heat pump installations require connection clearance with your regional Distribution Network Operator (DNO). Qualified engineers submit these applications directly, ensuring the grid connection is fully compliant before work starts. If you want a clear picture of how your property measures up, requesting a bespoke survey through Love Green Heat Pumps provides a straightforward assessment without high-pressure sales talk.
Step-by-Step Air to Water Heat Pump Installation Process
A turnkey air to water heat pump installation typically takes two to five working days. The job begins with decommissioning your existing setup. Heating engineers drain the old central heating system, safely disconnect the gas or oil boiler, and remove redundant header tanks from the loft space. Before any new hardware connects to your radiators, engineers power flush the entire wet pipework network. This essential clean removes accumulated magnetite sludge and rust, protecting the heat pump's internal heat exchanger from blockages right from day one.
Positioning and Mounting the Outdoor Unit
The outdoor unit requires a flat, completely stable surface. Installers lay a reinforced concrete slab or set heavy-duty rubber mounting rails on solid ground. Anti-vibration feet isolate the unit mechanically, preventing low-frequency hum from transferring through structural walls. Engineers also ensure unrestricted clearance for air intake and exhaust, alongside a dedicated gravel soakaway or gully connection to drain away natural condensate runoff cleanly during frosty weather.
Plumbing the Indoor Plant: Cylinders, Buffer Vessels, and Valves
Inside the property, plumbing work focuses on domestic hot water and circuit volume. The main plant components include:
- Unvented Hot Water Cylinder: Replaces the old copper cylinder with a stainless steel tank fitted with an oversized internal heat exchanger coil specifically designed for lower heat pump flow temperatures.
- Buffer Vessel or Low-Loss Header: Maintains minimum system water volume and prevents flow rate conflicts between the heat pump and home radiator circuits.
- Valves and Protection: Includes a three-way diverter valve to switch seamlessly between hot water and space heating, a high-performance magnetic filter to capture system debris, and insulated primary pipework passing through core-drilled external walls.
Electrical Wiring and Smart Controls Integration
An electrician wires a dedicated rotary isolator switch beside the outdoor unit, running an independent power cable back to the main consumer unit. They also mount an external ambient temperature sensor on a shaded, north-facing wall. This small sensor powers the weather compensation system, automatically nudging heating flow temperatures up on icy mornings and easing them back when ambient weather softens. The team links the system to digital programmable room thermostats and smartphone apps, leaving you with simple control over schedules and target temperatures. Homeowners seeking guidance on government standards and finding a certified installer can review the official advice before committing to an installation schedule.
Commissioning, Hydraulic Balancing, and Handover: Getting Optimal Performance
Precision commissioning turns installed hardware into an efficient heating system. A poorly commissioned unit will heat your home, but it will consume too much electricity doing so. Skilled heating engineers treat commissioning as a dedicated stage of work, calibrating flow rates, setting controls, and treating circuit water to protect the equipment for decades. Taking the time to dial in these settings is what ensures your air to water heat pump installation operates at peak seasonal efficiency from the first evening you switch it on.
The Art of Hydraulic Balancing and Flow Rate Calibration
Hydraulic balancing ensures hot water circulates evenly through every radiator, regardless of how far it sits from the plant room. Using flow meters and digital thermometers, engineers adjust the lockshield valve on each emitter. This calibration achieves the correct temperature differential (delta T) between flow and return pipework, typically around 5°C to 7°C. A balanced circuit prevents the compressor from straining, eliminates whistling noises, and stops radiators near the plant room from starving distant bedrooms of heat.
Configuring Weather Compensation and Hot Water Schedules
Fine-tuning the system controls establishes steady comfort without manual intervention:
- Weather Curve Setup: The engineer programs the heating curve to modulate water temperature automatically based on outdoor conditions. A mild 10°C day might call for 35°C water, while a sub-zero night automatically lifts the flow to 48°C.
- Baseline Living Temperatures: Heat pumps run best by maintaining a stable domestic baseline. Large temperature setbacks force the unit to work harder, whereas a gentle, steady profile preserves energy.
- Domestic Hot Water Timers: The hot water recharge cycle is scheduled during the early morning hours, letting you take advantage of cheaper off-peak electricity tariffs.
Customer Handover and HEIS Compliance Documentation
The final installation stage is an unhurried, practical walkthrough. Your engineer guides you through the thermostat interface, shows you how to adjust scheduled temperatures, and points out the magnetic filter isolation valves for routine annual servicing. You receive a complete handover pack containing the MCS compliance certificate, Building Regulations sign-off, system benchmark logbook, and manufacturer warranties. Because accredited installations follow strict consumer codes, you also gain full HEIS-accredited consumer protection across all workmanship. Ready to upgrade your home heating with complete peace of mind? Contact Love Green Heat Pumps today to discuss an engineered heating solution tailored to your property.
Choosing an Accredited Installer: Why Professional System Design Matters
An air to water heat pump is an engineered thermodynamic system, not an off-the-shelf domestic appliance. Unlike replacing an old combi boiler with another unit of identical kilowatt capacity, installing a heat pump demands precision hydraulic tailoring. The performance of your system relies on matching thermal dynamics, water flow rates, and building fabric characteristics. Cutting corners on design leads to noisy operation and inflated electricity usage. Working with qualified heating engineers ensures your system delivers dependable warmth for decades to come.
Essential Accreditations and Quality Standards to Look For
Always verify the credentials of your installation team before signing a contract. Look for these essential standards:
- HEIS Accreditation: Guarantees robust consumer protection, deposit insurance, and backed workmanship warranties through an independent regulatory framework.
- G3 Unvented Certification: Ensures engineers are legally qualified to install high-pressure domestic hot water storage systems safely.
- Part P Electrical Competence: Confirms that dedicated high-current wiring and isolator installations comply with national electrical safety regulations.
Never accept a rough verbal estimate. Insist on a complete written heat loss report demonstrating that every room's radiator output has been mathematically proven.
The Long-Term Value of Comprehensive Turnkey Service
Managing multiple independent subcontractors often results in poor communication and divided accountability. If a system runs inefficiently, the plumber blames the electrician, and the electrician blames the equipment supplier. Choosing a single turnkey provider avoids this friction entirely. One experienced team manages your initial heat loss survey, bespoke system sizing, electrical integration, and long-term annual servicing. For straightforward guidance rooted in trade expertise, consulting Love Green Heat Pumps offers dependable support without high-pressure sales tactics.
Preparing for Your Heating Survey and Next Steps
Arranging your property survey is straightforward. Before the heating engineer arrives, gather a recent copy of your property's Energy Performance Certificate (EPC), note down your annual electricity usage from your utility bills, and clear access to your current boiler, hot water cylinder, and attic space. Upgrading your heating is a calm, sensible home improvement. It creates quiet, dependable indoor warmth, reduces fossil fuel reliance, and protects your everyday living comfort across every British winter to come.
Delivering Lasting Warmth and Dependable Comfort
Transitioning to renewable heating shouldn't feel like an unpredictable gamble. When approached with meticulous room-by-room calculations and precise hydraulic balancing, an air to water heat pump installation transforms your home into a consistently warm sanctuary. You leave behind the sharp temperature swings of fossil fuels, gaining gentle, continuous warmth that protects your household comfort throughout the bitterest winter stretches.
Getting the best results always comes down to skilled engineering. Choosing a dedicated provider guarantees bespoke system sizing, careful radiator matching, and fully compliant electrical integration. You avoid the communication breakdowns of separate trades, securing dependable performance backed by thorough documentation and robust consumer standards.
Take control of your home's thermal future with confidence. Explore our turnkey heat pump installation services to discover how experienced heating engineers make upgrading simple, transparent, and completely stress-free.
Frequently Asked Questions
How long does an air to water heat pump installation take in an average home?
A typical residential air to water heat pump installation takes between two and five working days. The exact timeframe depends on whether existing radiators need upgrading and where the new hot water cylinder sits. Engineers spend the initial days removing the old boiler, flushing the wet pipework network, and fitting internal valves, completing the outdoor unit mounting, electrical connection, and final commissioning towards the end of the week.
Will I need to replace all the radiators in my home during the installation?
No, most homes only require a few selective radiator replacements rather than a complete overhaul. During your initial room-by-room heat loss survey, the heating engineer assesses each room emitter individually. Many existing double-panel radiators provide adequate surface area to heat rooms comfortably at lower flow temperatures. Only smaller, single-panel units in poorly insulated or larger rooms typically need swapping for double-convector or high-output aluminium alternatives.
Do I need planning permission to install an air to water heat pump in the UK?
Most domestic installations fall under Permitted Development rights, meaning you do not need full planning permission. To qualify, the outdoor unit must comply with strict acoustic limits under standard MCS 020, ensuring sound levels remain at or below 37.0 dB(A) at your neighbour's nearest window or door. Listed buildings and properties in designated conservation areas remain subject to specific local authority planning restrictions.
Where can the outdoor heat pump unit be placed outside my property?
The outdoor unit sits on a level ground slab or heavy-duty mounting rails along an external wall, garden pathway, or flat patio area. It requires clear space around the front and rear faces to ensure unobstructed airflow across the evaporator coil. Engineers avoid placing the compressor beneath bedroom windows and provide a dedicated soakaway or drain connection to handle seasonal condensate water safely.
Can an air to water heat pump connect to my existing hot water cylinder?
Standard hot water cylinders from traditional boiler systems are rarely compatible. Heat pumps circulate water at lower flow temperatures, requiring an unvented cylinder fitted with an enlarged internal heat exchanger coil to transfer heat effectively into domestic taps. Upgrading to a purpose-built unvented cylinder ensures rapid reheat cycles, excellent mains-pressure hot water delivery, and full compliance with UK domestic building regulations.
Is an air to water heat pump noisy when running outside the house?
Modern air to water heat pump units run quietly, producing a sound profile comparable to a domestic refrigerator or a low background hum. Sound levels typically range between 40 and 50 decibels at close range, softening significantly just a few metres away. Anti-vibration rubber mounting feet prevent mechanical hum from travelling into brickwork, while precision acoustic assessments ensure your neighbours experience zero domestic disturbance.
What happens if my electrical fuse board is too old for a heat pump?
If your consumer unit lacks spare capacity or modern residual current protection, your heating engineer upgrades the board or installs a dedicated secondary mini-consumer unit. The engineer also inspects the incoming service fuse rating to ensure your electrical supply handles the compressor load safely. All necessary electrical updates are completed seamlessly under Part P regulations, including the mandatory connection notifications sent directly to your regional Distribution Network Operator.
How disruptive is the installation work inside a lived-in property?
Disruption inside your living spaces is generally minimal and confined to specific areas. Most mechanical activity takes place in the plant room, airing cupboard, or outside where the main equipment sits. You will not have all your floorboards ripped up; engineers only lift access panels if specific pipework runs require minor rerouting. Heating engineers typically ensure your domestic water remains operational overnight, keeping domestic downtime to an absolute minimum.

